Sign up to get the latest on sales, new releases and more …
Mike talks about...
SAVING A SHATTERED BUST OF JFK
Why did you take on this restoration?
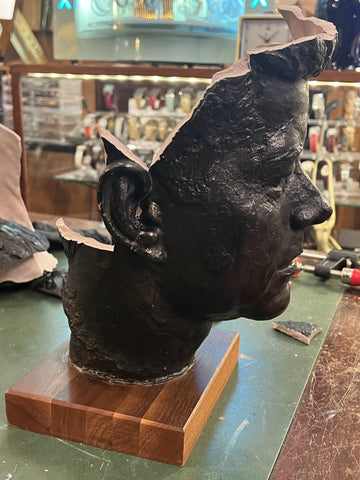
By 1968, when Edward Schillaci created this sculpture for Austin Productions, JFK was already an American icon. So, of course I was pleased to offer this stately bust in my shop. That made it very disappointing when it arrived broken into many pieces, with the cruel irony of the imagery not lost on me. Honestly, had it not been JFK, I might not have gone to such lengths, given how shattered it was. But the face remaining perfectly intact meant that it was an achievable repair, because the aesthetic center would show no evidence of having been broken. So, in the end, I took on the project out of respect, which is the spirit in which I am sharing it with you here, despite the unsettling imagery of the before photos. No ironic tone intended.
What glue did you use?
For ceramic, a two-part epoxy works best. I used a slow set formula, because quick set is for very easy projects where you have a clearly defined glue job of two or pieces. When trying to reconstruct a 3-dimensional piece with multiple parts, it gets serious fast. You need the time to adjust as you go along, and slow-set epoxy gives you that option by staying malleable longer.
Word to the wise:
If you are new to something like this, do not start with a sphere or head. The level of complexity that the third dimension brings makes it exponentially harder to achieve successful results. The final broken pieces can only be put into place effectively if all the glued areas can shift ever-so-slightly as you gently coax them into the limited remaining space. Since re-inserting every single tiny chip or flake is logistically impossible (some chips literally pulverize at the moment of impact), the once again intact piece will have inevitable gaps, but they can be filled in later. The goal here is to recreate the rounded sphere in such a way that filling in those small places will bring you back to a recognizable head (or spherical) shape.
Filling the gaps
Now that I had an intact infrastructure, I filled the remaining gaps and holes with a two-part wood filler. This material actually dries harder than wood, so it is a good medium for fixing ceramic. Wearing gloves, I mixed the two parts in my hand. Because it cures rather quickly, I made small batches and, without delay, methodically pushed the filler into the voids. I used my fingers because human hands are still the best tools we have.
The next step after the filler was mostly cured (about 20 minutes), was to use a small file with a point to etch back in the rough texture of the original.
Since the filler hardens like stone eventually, it is ideal to get the desired shape while it is still malleable. Once fully cured, I sanded the rest of the repaired areas to make them blend in and undiscernible to the touch. The color difference in the filled areas disappears when the finish of the piece is once again unified.
The Finish
The original finish from Austin Productions was a baked-on glaze, so I let go of attempting to replicate it since I do not have that equipment. The color was black with some bronzing that had eroded over the years. There were a limited number of these busts made, but still enough around for me to see a range of finishes, some more black and some more bronze. This made me feel I had some latitude to figure out what worked best in this case.
Several restorations ago, I learned that you can achieve amazing things with today’s spray paint. There are formulations available that will allow you to replicate a ceramic glaze or a metallic surface, and they can take a repaired sculpture and give it a convincing new life. That doesn’t mean I always nail it right away. First, after a coat of spray primer, I painted this bust with black paint, the approximate original color of this piece, but I found it unsatisfying. It looked one-dimensional and flat.
So, my next step was to paint the bust with a quality brass paint which, ultimately, looked convincing. But I realized, with reluctance, that it was also one-dimensional, and somehow lacking. Both options left the sculpture with the impression of being mass produced. I decided I wanted to (attempt to) elevate the finish such that it gave the appearance of being solid bronze.
At this juncture, I realized I needed a combination of the two paints. For a clean slate, I again painted over the brass with black. Then, I put my gloves back on and sprayed brass paint directly onto the gloves. I immediately hand-rubbed the bust, “smoothing out” the surface points and leaving the lower parts less polished. This turned out to be the alchemy I needed.
And that brings us to the final product! I am happy with the outcome and proud to offer this bust of JFK for sale here in our shop.
Comments will be approved before showing up.
Mike talks about…
MAKING A SOLID OAK MERSMAN COFFEE TABLE BETTER THAN NEW
Mike talks about...
RESTORING A PAUL MCCOBB PLANNER GROUP DROP LEAF DINING TABLE
Sign up to get the latest on sales, new releases and more…