Sign up to get the latest on sales, new releases and more …
Mike talks about...
RE-INVENTING A PAIR OF HOLLYWOOD REGENCY TABLE LAMPS
What made these lamps worth saving?
Good timing and good materials. A little while back I got a text from my friend/neighbor Brad, with a snapshot. “These are out on my street, should I grab them?” After a long winter and chilly spring, this was on one of the first warm days, and the good weather had me in an optimistic mood. Sure, I said. I knew that even dismantled for parts, these vintage metal lamps had intrinsic value. Since I regularly buy lighting parts for restoration, I know good quality components are expensive. The cast iron bases alone are worth about $100 a piece. I could certainly use the parts to make other lamps. Why let them go to the landfill?
Why did you restore them rather than “part them out”?
Though they once had a certain Hollywood Regency charm, the “antiqued bronze” finish just doesn’t appeal to our current sensibilities. But once they were dismantled, I started to get inspired by the idea of reinventing the lamps as themselves, yet better. Metal takes paint well, so the color could change, and I began to consider creative ways I could work with the amber crystals that remained on the lamps (there were a few missing). The black & white marble squares were one of the design elements on the lamps that had me visualizing a new black and white color scheme overall. I made peace with the idea of accepting the challenge of re-making these lamps into something fresh and contemporary.
What steps did you take?
1.Disassembly
As always, my first step was to take pictures of the lamps for reference before taking them apart. Then, I took them apart, photo documenting along the way for anything that might be tricky to remember.
Disassembly is a must for any project like this, especially if you plan to paint, and yet people are often tempted to skip it and try to paint the piece as a whole. Don’t. If you keep the parts in the order you take them off, you can easily reassemble by reversing that order -- and you will never be able to clean properly or apply paint evenly if you don’t separate the parts.
2. Cleaning
Sometimes I joke that I’ve built a business on cleaning things. It always surprises me how little effort people give to the mechanical process of cleaning, and how much you can accomplish with elbow grease. In the case of these lamps, the dirt was so caked on it looked like they hadn’t even been moved in 40 years. Always start with the mildest cleaning agent first, generally mild dish soap and water, which is what I used to clean these lamps…along with the aforementioned elbow grease, applied with a stiff nylon bristle brush.
3. Priming
Next I applied a spray-on metal primer. I painted outside, with all the pieces separated on cardboard. If I had it to do over again, I would have chosen a light-colored primer, as the dark undercoating required more coverage than a light primer would have needed.
4. Painting
For a larger, flatter surface I would have had them professionally powder coated, as you simply cannot replicate a professional finish on flat surfaces. But here, the ornate surfaces of these lamp parts allowed for a well-applied spray lacquer to work just fine (which was part of what encouraged me to take on this project in the first place).
The first paint I chose was called Pearl White, but after testing it on a small section I could see that it read more silver than white, which was not what I wanted. I was looking for a true white to bring a clean modern aesthetic to the elaborate details on the lamps, and allow them to shine through in an interesting way.
I was able to achieve my goal with a spray-on lacquer by Rust-Oleum that said simply “Lacquer”, with a white top to indicate the color, and the words “High Lustre Coating” and “Factory-Like Finish…”, both claims I found to be accurate. It dried quickly, allowing for additional coats to be applied without much waiting time. In the end, I applied as many as 10 coats, for a strong finish that will rival the durability of a powder coating.
For one last chip-resistant touch, I finished them off with a clear lacquer top coat over the white, which I did after they were already reassembled (taking care to mask off the marble). Not only did this give them an extra high-gloss finish, it subtly brought the pieces together as a whole.
5. Reassembly
Referencing the photos, I then rebuilt the lamps, sliding each piece over the threaded hollow rod that is at the core of most table lamps. In the end, I decided to leave one piece off, the decorative sunburst piece that, while pretty, nearly completely covered the marble piece in the original design, because…well, I’m not sure why they decided to cover up the gorgeous marble in the first place.
Otherwise, I kept every piece.
Now I just had to find a solution for the missing amber crystals, which I had already soaked in water to clean.
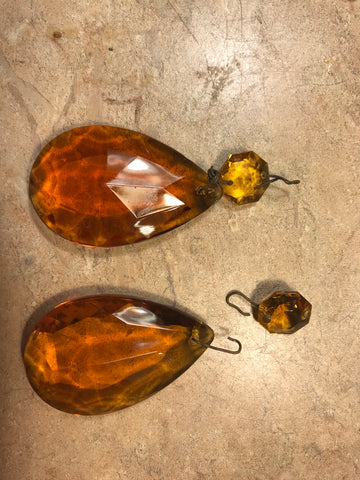
Originally, each lamp had a total of 14 double-hung chandelier crystals, in two tiers of seven, with a smaller crystal on top and a larger teardrop crystal on bottom. Though I had as many as 20 of the originals, I needed 28 to recreate them exactly. Buying new ones would require that I replace them all, which seemed wasteful and antithetical to the guiding principle of the whole project. So, I decided to separate the small upper crystal from the bottom, which effectively doubled the number I had. By using the smaller ones on the top tier and the larger ones on the bottom, I could fully honor the original look of the lamps using what I had available. I was even able to reuse the metal connectors to hang the crystals, since now, after separating the crystals, I had more than enough.
(Re-wiring these kinds of table lamps is quite simple, so I won’t waste too much time explaining what was a very straight-forward task of threading new wire up through a straight hollow core.)
6. Shade Selection
To complete the transformation, I now just needed to find shades. Though the originals were nowhere to be found when Brad found these lamps on the street, I know that they were likely large barrel shades with the same ornate Hollywood Regency aesthetic, perhaps with pleats, certainly with fringe. How to interpret that look for the new streamlined palette? After trying out several shapes, it seemed the barrel shape would still be the best, but the decoration should be minimal to allow the rest of the lamp to shine. In terms of color, anything white would have to compete with that bright lacquer, but black would hold its own.
Happily, to continue the recycling groove, I was able to find a pair of black barrel shades in a compact (more contemporary) size, still new in their package but available on Ebay, purchased a few years ago yet never used. When they arrived and we tried them on the lamps, it became clear that these shades were just waiting to complete the black and white color scheme of our transformed table lamps!
These cool lamps are currently for sale, with free shipping/delivery anywhere in the US.
Comments will be approved before showing up.
Mike talks about...
SAVING THE SHATTERED BUST OF A MID-CENTURY JFK BUST
Mike talks about…
MAKING A SOLID OAK MERSMAN COFFEE TABLE BETTER THAN NEW
Mike talks about...
RESTORING A PAUL MCCOBB PLANNER GROUP DROP LEAF DINING TABLE
Sign up to get the latest on sales, new releases and more…